| 상품명 | I/O Learning HAT with Full Node-RED Tutorial for Raspberry Pi |
|---|---|
| 판매가 | 113,850원 (부가세포함) |
| 제조사 | Sequent Microsystems |
| 배송비 | 3,000원 (50,000원 이상 구매 시 무료) |
| 원산지 | 중국 |
| 모델번호 | I/O Learning HAT with Full Node-RED Tutorial |
배송주기


| 옵션선택 |
(최소주문수량 1개 이상 / 최대주문수량 0개 이하)
사이즈 가이드수량을 선택해주세요.
위 옵션선택 박스를 선택하시면 아래에 상품이 추가됩니다.
| 상품명 | 상품수 | 가격 |
|---|---|---|
| I/O Learning HAT with Full Node-RED Tutorial for Raspberry Pi |


|
113850 ( |
할인가가 적용된 최종 결제예정금액은 주문 시 확인할 수 있습니다.

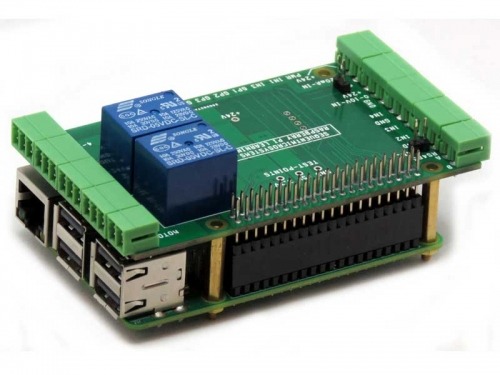
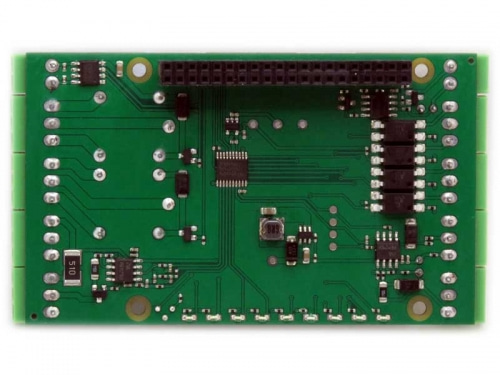
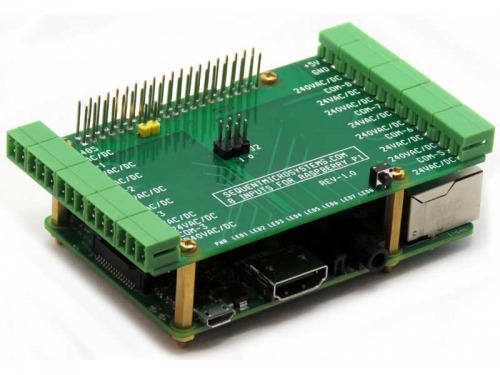
FEATURES
This card lets you learn to control automation interfaces using Node-RED. From "Hello World" to PID looks, it is the ideal teaching platform for student, teacher or hobbyist. It brings to Raspberry Pi all the common interfaces needed to connect to the automation world:
DESCRIPTION
Although the variety of sensors and actuators is almost unlimited, they can all be grouped in three categories, based on their electrical interfaces:
1. Serial communication - RS-485 is the dominant choice, due to its ability to support multiple devices with excellent noise immunity at long distances.
2. Digital inputs and outputs - From find simple switches, contacts and pushbuttons, to any circuit which can be powered by a relay.
3. Analog inputs and outputs - Temperature, pressure, humidity, level, position, light and other sensors. Motors, linear and rotary actuators, and many many other devices have analog inputs and outputs. The industry standards are 0-10V and 4-20mA current loops.
POWER REQUIREMENTS
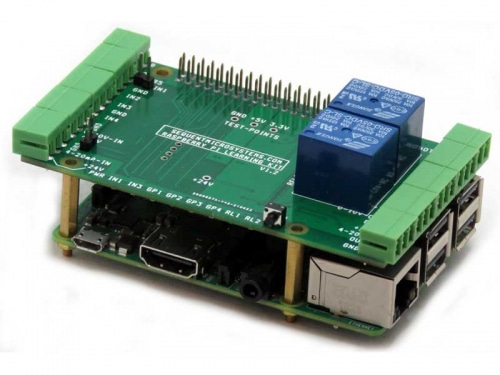
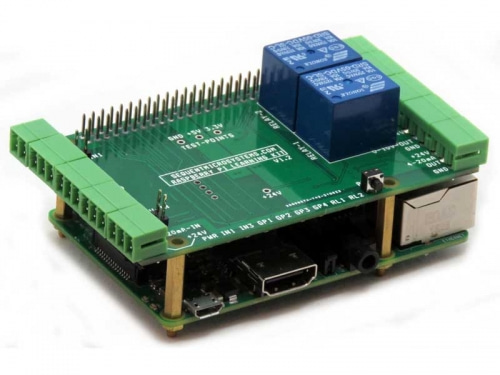
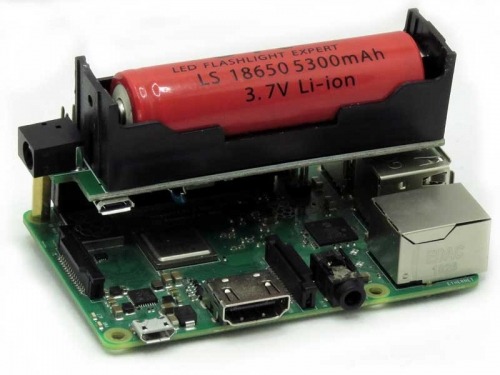
The I/O Learning Card needs 5V/50mA to operate with the relays off, or 200mA with both relays on. It is powered from the Raspberry Pi through the GPIO connector. A Raspberry Pi power supply able to provide minimum 3A is recommended.
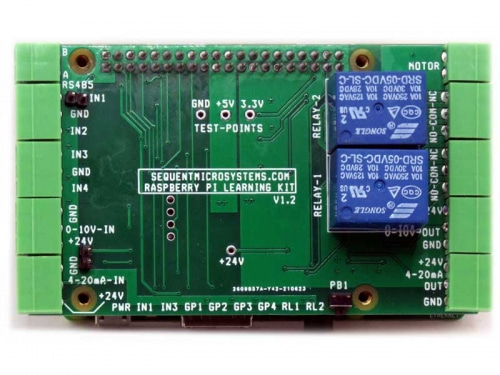
RS485 PORT
The Card contains a standard RS485 transceiver which can be accessed by the serial port of the Raspberry Pi. MODBUS protocol can be run on Raspberry Pi to access industry standard sensors and actuators.
PLUGGABLE CONNECTORS
Pluggable connectors ease connecting the card to external devices. All the connector plugs are included in your kit.
DISPLAY LEDS
Nine LEDs on the bottom edge of the card show you the status of the inputs and outputs. The leftmost LED shows when the power is connected to the board.
The next two LEDs, labeled IN1 and IN3, show the status of the corresponding opto-isolated digital inputs.
The middle four LEDs are general purpose. They can be connected in software to show the status of any input or output. They can also be programmed to light at a certain input or output level. For example, you can learn how to turn on a LED when a temperature reaches a threshold. You can also blink a led slower when a temperature is relatively low, and faster as it approaches a preset limit.
The two rightmost LEDs are routed to the corresponding relays and show when the relay coil is activated.
0-10V INPUT AND OUTPUT
Zero to 10V Input can be used to sense voltage levels from devices such as thermistors, humidity sensors, or photoresistors. Zero to 10V output can be used for actuating industry standard devices such as lighting controller.
4-20mA CURRENT LOOP INPUT AND OUTPUT
Widely used industry standard 4-20mA current loops can be used to control remote devices over long distances with high noise immunity.
PUSH BUTTON
A pushbutton is provided to be able to add manual input to any system. The button can also be used by Node-RED or other Raspberry Pi programming in an arbitrary manner. The first Tutorial lesson gives some examples from saying "Hello World" to sending SMS or email messages.
PWM MOTOR
The Motor port can drive a 5V/100mA DC Motor. You can learn how to control the speed and the direction of the motor from the command line, Python or Node-Red graphical user interface.
TWO SERVO INTERFACES
Since we ran out of processor resources, the servo ports are multiplexed with the analog output ports. The servo ports connectors consist of a 2x3 jumper where you can plug directly any of the readily available servos at Amazon or elsewhere.
SELF TEST LOOPBACK CABLE
The card is designed such as all inputs and outputs are in symmetrical pairs and can be self-tested with a loopback cable. The exceptions are the Motor and Servo ports, which cannot be tested with the cable. The self-test software detects automatically the position of the cable and reports accordingly the test results. The following tests can be performed:
DOWNLOADS
SOFTWARE
You can write your own application using the Command Line or Python Library provided. No programming is required if you use the Node-Red nodes we supply. You can drag-and-drop the functional blocks to design your application.
Node-RED PROGRAMMING
Node-RED is a programming tool for wiring together hardware devices, APIs and online services in new and interesting ways. It provides a browser-based editor that makes it easy to design flows using nodes from a large library covering a wide range of automation tasks.
The Learning Kit native Node-RED nodes included in the repository make it easy to interface with the hardware.
Node-RED TUTORIAL
The Tutorial will help you use the Learning Kit with Node-RED without writing a single line of code. It will show you how to use Node-RED to control each of the interfaces of the Learning Kit. It will start by building simple flows using the pushbuttons and the LEDs and advance to the point where you can control devices over the internet.
You can start learning Node-RED today without waiting for the Learning Kit. You will start by sending "Hello World" greetings to your screen or your speakers, and advance to sending emails and SMS messages to your smart phone.
Node-RED Tutorial Table of Contents (Preliminary)
1. Introduction
Before We Begin
What You Will Learn
Safety First!
Setting Up Your System
The I/O Learning Card
Node-RED: What’s It All About
Node-RED Basics
Becoming Familiar with the Node-RED System
2. Your First Flow – “Hello World”, What Else?
Hello World – As Simple as it Gets
Dreaded Documentation
Packing up, Cleaning House and Moving On
Graduation Time!
3. Using the Humble Pushbutton
Crawling – Pushbutton to Debug Output
Walking – Pushbutton Says “Hello World” Out Loud
Pushbutton to Console
Pushbutton to Sound
Running – Pushbutton Controls the World
Pushbutton sends Email
Pushbutton sends SMS Messages
4. Let there be light! – On board LEDs
Pushbutton to Light
Using Delay Blocks
Sub-Flows
Email to Light
5. Contact Closures Inputs
Contact to LED
Simple Arithmetic
Dashboard Outputs
6. Clickety Click – Using Relays
Dashboard Inputs
Dashboard to LED
Dashboard to Relay
Simple Motor Control
7. Measuring the World – Voltage Inputs
Analog Display
Using Potentiometers
Scaling Inputs
Simple Calculations
Sensing Light
Charting
Sensing Temperature
Temperature control (relay plus thermistor)
8. Controlling the World - Voltage Control
Analog Control
9. Factory Automation Inputs – Current Loops
Temperature Sensing
10. Factory Automation Outputs – Current Loops
11. Mighty Mini Motor – Proportional Speed Control
Proportional Control
Light Controlled Motor
Proportional Temperature Controller
Proportional Position Controller
12. Talking to Others – RS-485 Communications
Measuring Temperature and Humidity
Talking to Other Systems
Appendix
Node-RED Messages and How to Use Them
Simple Types in Node-RED
Simple Code in Node-RED
I/O Learning Card Electrical Interfaces
References
ACCESSORIES
A separate I/O accessories kit is available for purchase. Using each of the kit items is described at length in the Tutorial. Each Accessory is equipped with a pluggable mating connector and can be used with the examples in the Tutorial.
1. ON-OFF-ON Switch. The switch can be used to read the contact closure inputs.
YOUR KIT
When you purchase the I/O Learning Kit you will receive the following items:
QUICK START
The program will respond with a list of available commands.

고액결제의 경우 안전을 위해 카드사에서 확인전화를 드릴 수도 있습니다. 확인과정에서 도난 카드의 사용이나 타인 명의의 주문등
정상적인 주문이 아니라고 판단될 경우 임의로 주문을 보류 또는 취소할 수 있습니다.
무통장 입금은 상품 구매 대금은 PC뱅킹, 인터넷뱅킹, 텔레뱅킹 혹은 가까운 은행에서 직접 입금하시면 됩니다.
주문시 입력한 입금자명과 실제입금자의 성명이 반드시 일치하여야 하며, 7일 이내로 입금을 하셔야 하며 입금되지
않은 주문은 자동취소 됩니다.
배송 방법 : 택배
배송 지역 : 전국지역
배송 비용 : 3,000원
배송 기간 : 3일 ~ 14일
배송 안내 : - 산간벽지나 도서지방은 별도의 추가금액을 지불하셔야 하는 경우가 있습니다.
고객님께서 주문하신 상품은 입금 확인후 배송해 드립니다. 다만, 상품종류에 따라서 상품의 배송이 다소 지연될 수 있습니다.
교환 및 반품 주소
- [13211] 경기도 성남시 중원구 사기막골로62번길 33 (상대원동) 센터엠지식산업센터 S1227호
교환 및 반품이 가능한 경우
- 계약내용에 관한 서면을 받은 날부터 7일. 단, 그 서면을 받은 때보다 재화등의 공급이 늦게 이루어진 경우에는 재화등을 공급받거나 재화등의 공급이 시작된 날부터 7일 이내
- 공급받으신 상품 및 용역의 내용이 표시.광고 내용과 다르거나 계약내용과 다르게 이행된 때에는 당해 재화 등을 공급받은 날 부터 3월이내, 그사실을 알게 된 날 또는 알 수 있었던 날부터 30일이내
교환 및 반품이 불가능한 경우
- 이용자에게 책임 있는 사유로 재화 등이 멸실 또는 훼손된 경우(다만, 재화 등의 내용을 확인하기 위하여 포장 등을 훼손한 경우에는 청약철회를 할 수 있습니다)
- 이용자의 사용 또는 일부 소비에 의하여 재화 등의 가치가 현저히 감소한 경우
- 시간의 경과에 의하여 재판매가 곤란할 정도로 재화등의 가치가 현저히 감소한 경우
- 복제가 가능한 재화등의 포장을 훼손한 경우
- 개별 주문 생산되는 재화 등 청약철회시 판매자에게 회복할 수 없는 피해가 예상되어 소비자의 사전 동의를 얻은 경우
- 디지털 콘텐츠의 제공이 개시된 경우, (다만, 가분적 용역 또는 가분적 디지털콘텐츠로 구성된 계약의 경우 제공이 개시되지 아니한 부분은 청약철회를 할 수 있습니다.)
※ 고객님의 마음이 바뀌어 교환, 반품을 하실 경우 상품반송 비용은 고객님께서 부담하셔야 합니다.
(색상 교환, 사이즈 교환 등 포함)


 031-701-5502


퀵메뉴
상품검색
최근 본 상품
0장바구니
0배송조회
관심상품
좋아요
좋아요쿠폰
네이버톡톡
카카오톡 플러스친구
위로
아래로